
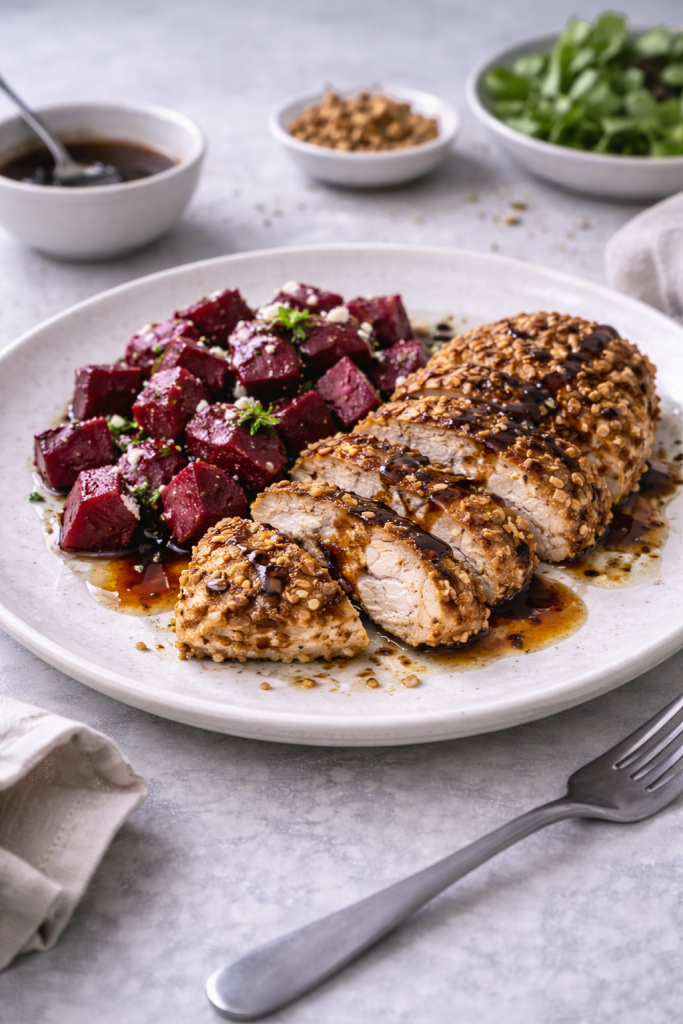
This is a dish built on contrast, but it only works when each part is handled carefully.
The crust needs to stay crisp, the chicken juicy, the sauce reduced just enough, and the beets kept simple. Nothing complicated — just attention in the right moments.
At a Glance
Difficulty
Moderate
Prep Time
25 minutes
Cook Time
20 minutes
Total Time
45 minutes
Servings
4 servings
Try this next: Essential Kitchen Tools for Beginners (What You Actually Need)
Ingredients
Where the Texture Comes From
From experience, the success of this dish depends on how well the crust is set before the chicken fully cooks.
If the heat is too high, the nuts burn before the inside is ready. Too low, and the crust doesn’t hold. Medium heat and patience give you that crisp exterior with a juicy center.
Instructions
- Start by slicing the chicken breasts in half horizontally to create thinner, even pieces. This helps them cook faster and more evenly.
- Season both sides with ¾ tsp of salt and ½ tsp of black pepper, pressing it lightly into the surface.
- Prepare a simple coating station with three plates: one with flour, one with the beaten egg, and one with finely chopped nuts.
- Coat each piece of chicken first in flour, shaking off any excess. This dry layer helps the egg stick better.
- Dip the chicken into the egg, making sure it’s fully coated.
- Press the chicken firmly into the nuts, covering the entire surface. Take a moment here — pressing helps the crust adhere and prevents it from falling off during cooking.
- Heat the olive oil in a wide pan over medium heat.
- Place the chicken into the pan and let it cook without moving for a few minutes. This is key — moving it too early can break the crust.
- Turn carefully once the underside is golden and set. Cook the other side until the chicken is fully cooked through and the crust is crisp.
- If the nuts start to darken too quickly, lower the heat slightly rather than removing the chicken — this keeps the cooking even.
- Remove the chicken from the pan and let it rest briefly. This helps retain juices inside.
- Prepare the balsamic sauce.
- Pour the balsamic vinegar into a small pan and add the honey. Bring to a gentle simmer over medium-low heat.
- Let it reduce slowly until it becomes slightly thicker and glossy. This usually takes several minutes — rushing it can make it too sharp.
- Once reduced, remove from heat and stir in the butter. This softens the acidity and gives the sauce a smoother finish.
- Set aside.
- In a bowl, combine the diced beets and sliced shallot.
- Add the red wine vinegar, then season with the remaining salt and pepper. Toss gently so everything is coated but not mashed.
- Slice the rested chicken into thick pieces.
- Spoon the balsamic sauce over the top, letting it run slightly over the crust.
- Serve with the beet salad alongside.
Also worth trying: Chicken Saltimbocca with Caper Butter and Grilled Carrots, Grilled Salmon and Zucchini Skewers, Grilled Camembert, Simply Served
Texture & Flavor Notes
The chicken should be crisp on the outside with a nutty crust, while staying tender inside.
The balsamic sauce adds a sharp-sweet contrast, and the beets bring an earthy, slightly acidic balance that keeps the dish from feeling heavy.
Tips for Best Results
- Keep heat at medium to avoid burning the nuts
- Press the crust firmly so it adheres well
- Let the chicken rest before slicing
- Reduce balsamic slowly for a smoother flavor
Small detail that helps: if the sauce becomes too thick, a teaspoon of warm water will loosen it without affecting taste.
FAQ
Can I use store-bought cooked beets?
Yes, they work perfectly here and save time. Just make sure they’re not overly wet before mixing.
What nuts work best for the crust?
Walnuts and hazelnuts give the most flavor, but almonds work well for a milder version.
How do I know the chicken is cooked through?
It should be white inside and firm but still juicy. Internal temperature should reach about 74°C (165°F).
Can I bake the chicken instead of frying?
Yes, but the crust won’t be as crisp. Bake at high heat (around 200°C / 400°F) until cooked through.
Leave a Reply